
Tech-Free, No-Cost Ways to Dramatically Improve your Podcast Audio
“Oh, man – I sound like I’m screaming into the Grand Canyon!”
That’s what I thought when I listened back to my first at-home podcasting session - my voice was a sharp, echoey mess. Determined to figure out the problem, I switched mics, fiddled with the gain and EQ, tested recording software, and swapped cables. When that didn’t work, I spent hours desperately trying to fix the track in post. I had assumed it was an equipment problem, but I finally realized: it’s not my stuff – it’s my space. Bare walls and glass doors made my little home office an acoustic nightmare. It was mid-2020, so going to a recording studio was not an option – I had to bring the recording studio to me.
I was shocked at how much improvement I heard after giving that room some acoustic TLC. It turns out that the cheapest, easiest and quickest way to ensure you get great sound in a DIY podcasting setup is to make the space recording-friendly. The fanciest microphone money can buy won’t make up for bad acoustics!
(To learn more about why leveraging great sound is crucial to a successful podcast, download my free guide “Avoiding the Top 5 Podcasting Pitfalls.”)
In this post I’m going to tell you some of my favorite, little-known hacks for acoustifying (yes, I made that up) any DIY recording space. The good news is, most of them use stuff you’ve already got around the house. You can do this in any space - you don’t need to build a custom sound booth in your living room or have a walk-in closet you can convert. (That one always makes me laugh. I lived in New York City for 15 years - my closet wasn’t even big enough for an ironing board.) The strategies below are all tech-free, low- or no-cost, and ones I have personally had success with.
But first, a little Acoustics 101. The word “acoustics” is used to describe how sound waves move within a certain space. Sound waves can be absorbed, reflected, and/or transmitted (moving to another space through a material, like a conversation you can hear through a wall). Reflection causes reverberation, echo and vibrations. A reflective or “bouncy” space is good for recording things like rock music, but for recording speech, it’s the enemy. That reverb makes voices sharp, tinny, hollow, and creates an echo you’ll spend agonizing hours in post trying to remove. Plus, it can give your show an amateurish vibe. What we want for great recorded speech is a space that’s “dry,” or has high sound absorption, which will make your voice clear and warm.
Every room has reflective surfaces, ones that are hard, smooth, and solid – think blank walls, windows, mirrors, hardwood floors, etc. Things that are soft and squishy - like blankets, curtains, cushions, carpets, etc. - will absorb sound. Basically, you want the soft stuff between your voice and the hard stuff, so that sound waves get absorbed before they have a chance to bounce off something.
Here are my favorite acoustics hacks:
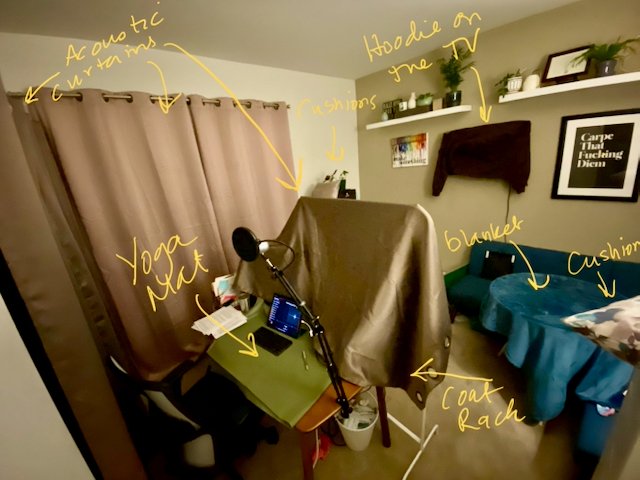
Gather your Squishy Stuff. Surround yourself with the things that absorb sound by putting your furniture to work. Toss a throw blanket over that table behind you. Drape a beach towel over a bookcase or chest of drawers. If you’ve got a big, blank wall, lean some couch cushions against it to break up the surface. Grab a cheap throw rug for an uncarpeted floor. The great thing is, you can set all this up for the hour or two you’re recording, then put it back the way it was.
Prep your Monitor & Desk – If you’re recording with a giant external monitor in front of you, you’re essentially talking into a sound trampoline – it’s going to come right back at you and your mic. If you’re mic is set up on a desk or table with a hard surface, sound waves are bouncing off that too. Sound moves in all directions, including downward. Throw a towel over your monitor and roll a mat across your desk. This makes a great DIY mini sound booth, and will not only stop that reverb but make your voice sound even warmer.

The Magic of Blackout Curtains. This is my FAVORITE hack!! When I was setting up my recording space, I knew I needed to treat it for acoustics, but I just couldn’t stand the idea of being surrounded by depressing black egg carton panels all day. I was researching drapes to cover a sliding glass door, when I discovered that most blackout curtains are not only light blocking, they are also sound dampening. They absorb sound inside, AND block transmission of sound from outside (great for those of us on busy streets or in apartment complexes). I chose these curtains*, which are made for theaters, so I knew they’d be heavy duty. But they aren’t just for windows: they worked so well that I put a curtain rod on the wall over a closet with full length mirrors and hung them there, too. You could easily do that for a big, bare wall too. Unlike the foam squares, you can pick whatever color is most inspiring to you, AND you can pull them back when you’re done recording.
Clothing Rack Hack. What to do if you record in big open space or aren’t allowed to hang up curtains on the wall? Get a collapsable clothing rack like this one that you can put up, take down and store easily. Then drape a blanket or sheet over it and position it where you need some sound absorption around your recording station – it could be in front, on either side or behind you (don’t forget about behind you!) – the closer to you, the better.
Acoustic Panel Upgrade. I’m not anti-acoustic panels, just not crazy about the traditional chonky egg carton ones. Instead, I use these which are great to put on the ceiling, in corners and along the tops of the walls where you can’t throw a cushion. They’re slim, easy to set up and move around, come in a ton of colors, and can be arranged in cool patterns if you want them to double as decoration.
The early days of my setup when I was trying literally anything. I could put this all up and break it down in 5 minutes.
One way to check how “bouncy” your space is, is to snap it out. Snap a couple of times and listen for how loud, splashy, or dull the sound is. To get a sense of what you’re listening for, move around your home and snap in different spaces – try the bathroom, hallway, and bedroom. As you play with different ways to improve your acoustics, this is a quick and simple way to see what’s working.
There you have it! These tips and hacks have improved not only my sound but my confidence as a podcaster. Try them out, and let me know what you think!
And no disrespect to the Grand Canyon.
*Some of the links on this page are affiliate links, which means I may get a small commission if you use them to purchase the items, which helps me cover the cost of creating this free content.

